
Welcome to the world of building your gaming PC! If you’re a beginner and eager to dive into the exciting process of creating your gaming rig, you’ve come to the right place. In this step-by-step guide to “How to set up pc for gaming”, we’ll walk you through the process in a simple and easy-to-follow manner. From choosing the right components to assembling them together, we’ll cover everything you need to know. So, get ready to start on a thrilling journey as we simplify the art of building a gaming PC, turning your dream into a reality. Let’s get started!
Before we dive into the details, let’s address a compelling question that might be on your mind
Contents
- 1 "Why should I build a new gaming PC instead of buying a standard pre-built one?"
- 2 The common terminologies that we must understand to build a Gaming PC
- 3 The essential components for building your gaming PC
- 4 Here's a step-by-step guide to building a gaming PC:
- 5 Videos for your reference on how to set up pc for gaming
- 6 Intel i7- 13700k vs. Intel i9-13900k gaming
- 7 Signs of CPU failure
"Why should I build a new gaming PC instead of buying a standard pre-built one?"
The answer to this question is
Building your own gaming PC allows you to customize every aspect, from the components to the aesthetics, giving you a unique and personalized gaming experience that reflects your style and preferences. The satisfaction of successfully building a gaming PC from scratch and then enjoying the smooth performance and stunning graphics of your favorite games on a machine you built with your own hands is an unparalleled feeling that enhances your gaming journey.
We understand that many of you must be very new to building gaming PC hence
Let’s get familiarised with
The common terminologies that we must understand to build a Gaming PC
(If you’re familiar with these terms, feel free to skip this section)
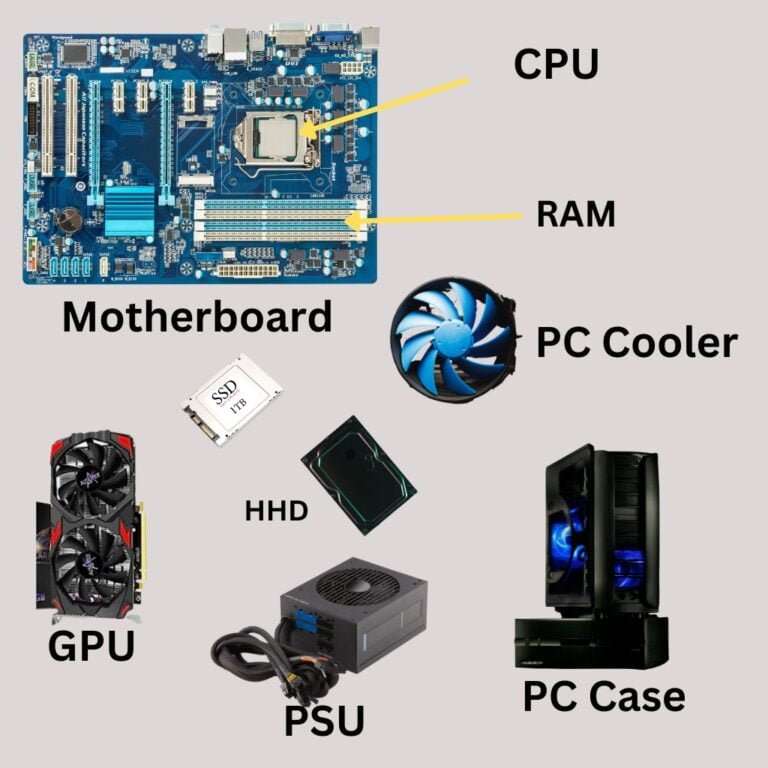
1) Motherboard
The motherboard is the main circuit board in your computer that connects and allows communication between all the other components. It acts as the central hub, providing slots, sockets, and connectors for the CPU, RAM, GPU, storage devices, and more. Think of it as the backbone of your PC, enabling all the hardware to work together harmoniously to power your gaming experience.
1 A) Peripheral Component Interconnect Express (PCIe) Slot
A PCIe slot is a type of expansion slot found on a motherboard. It is used to connect expansion cards, such as graphics cards, sound cards, or network cards, to the motherboard. The PCIe slot provides a high-speed data pathway between the expansion card and the rest of the computer system. It allows for faster communication and data transfer compared to older expansion slot technologies. The number and type of PCIe slots on a motherboard can vary, and it is important to ensure compatibility between the expansion card and the available PCIe slots when installing components. In short, the PCIe slot is a crucial interface that enables you to add additional functionality and enhance the performance of your gaming PC by connecting various expansion cards.
2) Central Processing Unit (CPU)
The CPU is the brain of your computer. It performs calculations, executes instructions, and manages the overall operations of your system. It handles tasks such as running applications, processing data, and performing calculations required for gaming. In simpler terms, the CPU is responsible for the speed and performance of your computer, making it a crucial component for gaming and other tasks.
3) Graphics Processing Unit (GPU)
The GPU is a specialized component in your computer that handles the rendering of visuals and graphics. It is responsible for processing and generating the images you see on your screen while gaming or using graphics-intensive applications. The GPU is designed to perform complex mathematical calculations required for rendering 2D and 3D graphics quickly and efficiently. In essence, the GPU is the powerhouse behind delivering stunning graphics, smooth animations, and realistic visual effects in games, making it a critical component for an immersive gaming experience.
4) Random Access Memory (RAM)
RAM is a type of computer memory that is used for storing data that the CPU needs to access quickly. It acts as a temporary workspace for the processor, allowing it to read and write data rapidly. When you run programs or play games on your computer, the data they require is temporarily stored in RAM for faster access, resulting in quicker response times and smoother performance. Think of RAM as a desk where the CPU can easily access information instead of constantly retrieving it from slower storage devices like hard drives. Having more RAM allows your computer to handle multiple tasks simultaneously and run resource-intensive applications more efficiently, ultimately enhancing your overall gaming experience.
5) Solid State Drive (SSD)
SSD is a type of storage device used in computers. Unlike traditional hard disk drives (HDDs), which use spinning magnetic disks to store data, SSDs use flash memory chips to store and retrieve data quickly. The absence of moving parts in SSDs results in faster data access, reduced loading times, and improved system responsiveness. With an SSD, games, applications, and files load more swiftly, allowing for smoother gaming experiences and faster system boot times. SSDs are known for their reliability, durability, and quieter operation compared to HDDs. In summary, an SSD offers faster performance and a more efficient storage solution for your gaming PC.
6) Hard Disk Drive (HDD)
HDD is a storage device used in computers to store all kinds of data, such as files, documents, pictures, videos, and software. It works like a digital filing cabinet for your computer, allowing you to save and access information whenever you need it. Inside the HDD, there are metal disks that spin very fast, and data is written or read using a magnetic head. As you add or remove files, the magnetic head quickly moves around to find the right spot on the spinning disks. HDDs have been around for a long time and are a reliable and cost-effective way to store large amounts of data on your gaming PC.
7) Power Supply Unit (PSU)
PSU is a vital component of a computer that supplies electrical power to all other parts of the system. It converts the AC (alternating current) power from your wall outlet into DC (direct current) power that the computer’s components can use. The PSU ensures a steady and reliable power supply to the CPU, GPU, motherboard, storage devices, and other components, allowing them to operate smoothly. It is important to choose a PSU with sufficient wattage to meet the power requirements of your system, and it should have the necessary connectors to support your components, especially the graphics card. The PSU plays a crucial role in providing stable and consistent power to your gaming PC, making it an essential component for a reliable and efficient system.
8) PC Case
A PC case, also known as a computer chassis or tower, is the enclosure that houses and protects all computer components. It is the outer shell that holds the motherboard, CPU, GPU, storage devices, power supply, and other hardware components. The case provides a framework and structure for assembling and organizing the internal components of a computer. It also plays a role in cooling by providing airflow and space for fans or liquid cooling systems to dissipate heat generated by the components. PC cases come in various sizes and designs, offering different features such as cable management, dust filters, and customizable aesthetics. Ultimately, the PC case is both a protective shell and a platform for building and showcasing your gaming PC.
10) PC Cooler
PC coolers are designed to drive away heat generated by the computer’s components, such as the CPU and GPU, to prevent overheating and ensure optimal performance. There are various types of PC coolers available, including air coolers and liquid coolers (both All-in-One and custom loops).
We hope that understanding these basic terms and their importance will make your journey ahead smoother.
Now, let’s understand how to choose
The essential components for building your gaming PC
Here is a list of the essential parts required
1) Motherboard
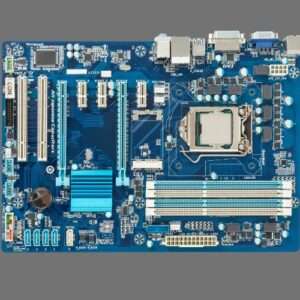
While selecting a motherboard, also consider what type of GPU, RAM, CPU and SSD devices you are planning to have for your gaming PC. If you just select the motherboard in isolation, you will have to compromise all components of the gaming PC. Also, considering the future-proofing factor means a motherboard that should be compatible with a newer version of GPU and CPU and should have a minimum of 4 slots of RAM, as you can go up to 32 GB RAM as per your requirements.
For a Gaming PC go for an ATX (Advanced Technology eXtended) Motherboard instead of Micro-ATX (mATX) which is meant for the smaller case or Mini-ITX is needed for compact gaming setup
Choosing between a motherboard with PCIe 4.0 or PCIe 5.0 is a significant consideration. If your tasks involve live streaming or high-end video editing, opting for PCIe 5.0 may be necessary. However, for gaming purposes alone, a motherboard with PCIe 4.0 should suffice. It’s important to note that PCIe 5.0 comes with a higher cost and requires compatible GPU, RAM, and SSD devices. Assess your specific requirements and budget to make an informed decision regarding the PCIe version for your motherboard.
Presently, AMD and Intel are the dominant players in the motherboard market. Consider your preferred choice of GPU, CPU and compatibility with other components when selecting the appropriate motherboard.
2) GPU

Selecting GPU is the most important you will be making for building your gaming PC, as many modern games require a capable GPU to run smoothly. Newer titles often utilize advanced graphical features, such as ray tracing or complex physics simulations, which rely heavily on GPU performance. Having a powerful GPU ensures compatibility with current and future games, allowing you to enjoy the latest gaming experiences without compromising on performance.
Also, consider graphical settings and visual fidelity while selecting GPU, a strong GPU allows for higher graphical settings and better visual fidelity in games. It enables you to play games at higher resolutions (such as 1080p, 1440p, or 4K) and with more detailed textures, realistic lighting, and advanced visual effects. This enhances the immersion and visual quality, making games more engaging and visually impressive.
Though the budget will be the primary choice but also consider below mentioned two points along with the above-mentioned points
1 Consider the games you’ll be playing
2 The monitor you’ll use to enjoy them.
NVIDIA and AMD are the leading GPU brands, while Intel has recently entered the GPU market.
3) CPU
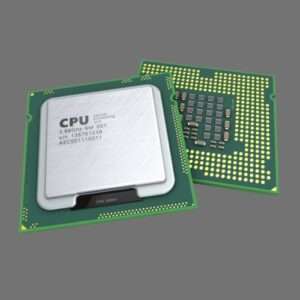
Though common understanding for selecting a CPU is that first, determine your budget and the level of gaming performance you desire or look for a CPU that offers a good balance of price and performance within your budget range. Solely considering these points, we end up buying the wrong CPU.
When selecting a CPU, it’s crucial to choose one that supports your GPU and is compatible with your motherboard. Since the GPU plays a vital role in gaming, the CPU should be capable enough to handle it. This approach helps you allocate your budget efficiently and potentially save money, contributing to an effective gaming setup. You can opt for CPUs from either Intel or AMD, depending on your specific requirements and considering compatibility with the GPU and motherboard. Choosing a higher model number ensures a more recent version, which helps future-proof your system by supporting newer GPUs and games. While it may involve a slightly higher cost upfront, it saves your time, energy, and unnecessary expenses in the long run by avoiding the need for frequent CPU replacements.
If you wish to know a comparison of top-rated CPUs, read “AMD Ryzen 9 7900X3D Vs AMD Ryzen 9 5950X“
4) RAM
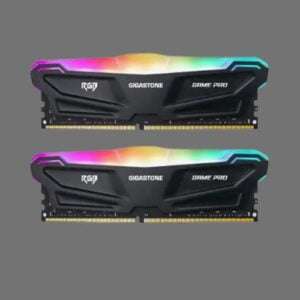
RAM is crucial for gaming, and it’s important to consider factors beyond just capacity to make the right choice. When selecting RAM, factors like DDR type and CAS latency (CL or C) are significant. DDR4 is widely used for gaming, providing excellent performance, especially with CL16 or CL18 (lower latency results in better performance). While there’s more to DDR and CAS latency, let’s keep this explanation concise and to the point.
Another important point when buying RAM, it’s best to get them in kits of two or four. This ensures they have the same model number and avoids compatibility problems. For most gamers, 16GB of RAM (2x8GB kit) is more than enough. Only if you plan to do live streaming or high-end video editing would you need 32GB of RAM (4x8GB kit).
5) SSDs
While selecting SSDs, one important question to be considered is,
Which are better SSDs, SATA or NVMe (Non-Volatile Memory Express) SSDs?
The answer is SATA SSDs still offer substantial performance improvements over traditional hard disk drives (HDDs), NVMe SSDs provide even greater speed, responsiveness, and efficiency. NVMe SSDs are particularly beneficial for tasks that require fast data access, such as gaming, content creation, video editing, and other demanding applications.
You will be surprised to note that consoles like PS5 and Xbox Series use only NVMe SSDs. If you are going for NVMe SSDs, look for the size and compatibility as per your motherboard or select a motherboard as per your NVMe SSDs (along with GPU and CPU Options). As per the user data, NVMe SSDs with PCIe 3 and PCIe 4 is widely popular among gamers even though PCIe 5 is available in the market. Given the demands of modern AAA gaming, a storage capacity of 500 GB is considered a standard requirement for a gaming PC. hence select NVMe SSDs accordingly, just to inform you NVMe SSDs are available up to 4 TB capacity as well. For a personal gaming PC, getting an SSD larger than 500GB is unnecessary spending, as HDDs are a more budget-friendly option for storage purposes
Here is a detailed article on PCIe Gen 5.0 SSDs vs 4.0, if you wish to know more about lateset NVMe SSDs
6) HDD

Before going for HDD for gaming PC
We must consider the following question.
Should we have HDD if enough SSD storage is available?
Having an HDD (Hard Disk Drive) alongside SSD (Solid State Drive) storage is not strictly necessary, but it can still be beneficial depending on your specific storage needs and budget.
As we have seen earlier SSDs offer numerous advantages over HDDs, including faster read and write speeds, quicker boot times, and improved overall system responsiveness. If you have enough SSD storage to accommodate your operating system, frequently used applications, and games, you may not require an HDD for everyday tasks and gaming.
However, HDDs still have some advantages, such as providing larger storage capacities at a more affordable price per gigabyte compared to SSDs. If you need additional storage space for media files, large backups, or less frequently accessed data, an HDD can be a cost-effective option.
If you’re working with a tight budget for building your gaming PC, we feel it’s a good idea to prioritize other components and consider skipping the HDD for now if you have already decided SSDs with 500GB. Instead, invest in higher-priority components, like better GPU or CPU. You can always add an HDD later when you truly need the additional storage space.
7) PSU

While selecting the right PSU, determine the power requirements of your system. Calculate the total power consumption of all components to ensure the PSU has sufficient wattage to handle the load. It’s recommended to choose a PSU with some headroom to accommodate future upgrades. Our research suggests that a PSU with a wattage of 700W to 800W is sufficient for most gamers to enjoy current-generation AAA gaming. However, if you’re considering future-proofing your system and investing in high-end components like motherboards, GPUs, or CPUs, the newer PSUs with 1200W to 1300W would be a more suitable choice. Additionally, make sure to verify if your shortlisted PSU includes LLC (Inductor-Inductor-Capacitor) Topology. This feature improves stability by regulating voltage levels, reducing ripple and noise, and ensuring a consistent and reliable power supply to all components.
Let’s address an important misconception about PSU brand selection. Many popular brands are actually manufactured by a single company called Channel Well Technology (CWT). So, don’t be swayed solely by marketing efforts or higher prices of certain brands. Instead, focus on finding the most economical option and check if it’s manufactured by CWT. This way, you can save money and allocate it to other essential gaming components. Be a smart shopper and make the most of your budget!
8) PC Case
While selecting a gaming PC case, several factors should be considered. First, ensure that the case’s form factor matches your motherboard (ATX, Micro-ATX, or Mini-ITX) for proper compatibility. Next, look for a case with excellent cooling and airflow options, including fan mounts, dust filters, and space for liquid cooling to keep your components cool during intense gaming sessions.
Check the GPU clearance and available drive bays to accommodate the size of your graphics card and storage needs (HDDs and SSDs). A case with adequate cable management options, such as routing holes and tie-down points, will help maintain a tidy build, improve airflow, and ease future upgrades or maintenance.
PC Case is a one-time investment hence consider the build quality and materials; opting for cases made from durable materials like steel or aluminium ensures sturdiness. Additionally, pick a case that matches your aesthetic preferences and fits your gaming setup’s style, with various design options and RGB lighting.
For added convenience, check for front-panel I/O ports, including USB, audio jacks, and possibly USB Type-C. Ensure the case has enough expansion slots and space for potential future upgrades, such as adding more drives or larger components, to ensure future-proofing.
Lastly, factor in the price and find a case that strikes a good balance between features, quality, and affordability, considering your budget limitations. Don’t forget to look for cases with removable dust filters to help keep the interior clean and reduce maintenance requirements.
9) PC cooler

Based on your gaming requirements and budget, you can go for Air Cooler or liquid cooler (both All-in-One and custom loops). We personally feel that if you have great technical knowledge, then go for Custom Loop Liquid cooler as they are difficult to assemble and maintain even though they are best in terms of providing efficient cooling to all major parts like CPU, GPU and Motherboard.
In our opinion, if you’re not playing high-end games regularly, an air cooler would be a suitable choice. However, for gamers who frequently engage in high-end gaming or streaming for extended periods (around 6 to 8 hours), an AIO liquid cooler is a more efficient option to maintain smooth gaming performance.
Another essential point to consider when choosing between air coolers and AIO liquid coolers is their size. Air coolers can be bulky and sometimes interfere with the RAM during installation. They may not be suitable for certain PC cases. On the other hand, AIO liquid coolers, while slightly more expensive than air coolers, provide better space utilization and give your PC a more aesthetic look.
How to select AIO liquid coolers
- 120mm AIO Cooler: Ideal for Compact cases with limited space for cooling solutions and lower TDP (Thermal Design Power) CPUs.
- 240mm AIO Cooler: Ideal for Most mid-range gaming setups, moderate to high TDP CPUs.
- 360mm AIO Cooler: Ideal for Enthusiast-level gaming PCs, high-end CPUs with high TDP.
Let’s also check,
How to Select the Right Air Cooler?
Check if the air cooler is compatible with your CPU socket type (e.g., LGA1200, AM4, etc.). Ensure it is designed to fit your specific CPU to avoid any compatibility issues. Consider the Thermal Design Power (TDP) rating of your CPU. The air cooler should have a TDP rating that is equal to or higher than your CPU’s TDP to ensure adequate cooling. Check the dimensions of the air cooler, especially its height, to ensure it will fit inside your PC case without interfering with other components like RAM or the side panel.
Look for air coolers with more heat pipes and higher fin density. These features contribute to better heat dissipation and cooling efficiency. Consider the size and speed (RPM) of the cooler’s fan(s). Larger fans and higher RPM can provide better airflow and cooling performance. Check the noise level of the air cooler, usually measured in decibels (dB). Opt for a cooler with quieter operation if noise is a concern for you. Choose a cooler made from high-quality materials like copper or aluminium, as they offer better heat transfer and durability.
Consider the design and aesthetics of the air cooler. Some coolers come with RGB lighting and customizable options to match your PC’s theme. Compare prices among different air coolers and choose one that offers a good balance between features and price. Also, check for warranties to ensure your investment is protected.
10) USB drive with Windows 11 Home

Make sure you have a USB drive with either Windows 11 Home ready. This will allow us to install the operating system on your gaming PC. If you’re unsure how to create a Windows 11 USB drive, don’t worry; we’ve got you covered with a video guide in the “How to assemble your new gaming PC” section.
We suggest that you should go with Windows 11 because installing Windows 11 on your gaming PC can be beneficial because it offers improved performance, better gaming optimization, and new features designed to enhance your gaming experience compared to Windows 10.
After shortlisting gaming PC components, the next step to set up a gaming PC
As you know, we can not have a standard process to set up a new gaming PC as each gamer will have different sets of gaming PC components as per their needs and preference, however, having a basic understanding of the process of setting up a new process makes our job slightly easier. Also, request you to check the manuals of each product (we know it is lengthy but just go through, especially regarding the installation & compatibility section)
These steps may appear overwhelming but do not worry, just have a look at them. These steps you can adapt for the right sequence to putting components while assembling your gaming PC, we have enclosed relevant videos in the next section for more clarity.
Here's a step-by-step guide to building a gaming PC:
1) Prepare Your Workspace: Find a clean, well-lit area with a flat surface to work on. Make sure you have all the necessary tools, including a Phillips-head screwdriver, cable ties, and thermal paste.
2) Install the CPU: Open the CPU socket on the motherboard and gently place the CPU in the correct orientation. Close the socket and secure it.
3) Install an Air cooler Pump on the CPU, in case you are going to go for an AIO Liquid cooler, just install only AIO liquid cooler Pump on the CPU, we will install other Radaitor, fans on the PC case later and connect cables later
4) Install the RAM: Locate the RAM slots on the motherboard and insert the RAM sticks, aligning the notches. Apply gentle pressure until they click into place.
5)Install the NVMe SSD; For NVMe SSD, find the dedicated slot on the motherboard and install it securely.
6) Now first fix fans on Radiator (of AIO Liquid cooler) and make it ready to install on the PC case top (from inside)
7) Now open the PC case and open it from the front and back and secure its cables properly,
8) Now install the Radiator on Top of the PC case (from inside), screw it properly so that it stays properly on the PC case
9) Now install IO Shiel (that comes with Motherboard) on the PC case and fix it properly with screws
10) Now attach PSU cables on Motherboard at the respective place (before you mount the motherboard on the PC case)
11) Now Mount the motherboard on your PC case and screw it properly to make it secure.
12) Now install HDD in a suitable drive bay inside the PC case (enclosed video for your reference just after this section) and connect it to Motherboard,
13) First take out all the cables including cables for GPU on your PSU and install PSU from the back or from the side as per the slot available on your PC Case, ensure that PSU fans are facing towards the vents available on the PC case, Now just screw it properly to make PSU place stable on your PC case
14) Now connect the Radiator (AIO Liquid coolers) cables to the Pump available on the CPU (which we installed in step 3), enclosed video for your reference just after this section.
15) Now put the power cable in the power cable slot available on Motherboard
16) Now connect respective cables available on the PC case to the Motherboard board like USB drive cables, Fan cables, RGB cables etc. ( Go through the video available after all the steps for more detail)
17) Install the GPU: Find the PCIe slot on the motherboard and gently insert the GPU, ensuring it’s fully seated. Secure it with screws. Now plug GPU cables into PSU power cables.
18) Now connect the monitor using the HDMI port available on your gaming PC case
19) Now connect the USB drive with Windows 11 to the USB slot available on the PC case
20) Now Plugin the power supply socket and switch on the PC and Monitor
21) Windows will start loading automatically to your PC and your PC is ready
22) After checking all cable connections properly, close the PC case from both sides and Plug in the Keyboard and Mouse to the respective stot available on the PC
We know simply going through instructions may not be good enough to build a PC; hence we have enclosed relevant videos in the next section to make your journey of building a PC more informative and comfortable
Videos for your reference on how to set up pc for gaming
We value collaboration and are committed to sharing valuable content. Below, you’ll find some of the best YouTube videos that can greatly assist you in setting up your gaming PC.
Congratulations! You’ve reached the end of our guide on how to set up a gaming PC for beginners. By now, you should have a great understanding of the essential components needed to build your gaming rig and the step-by-step process to assemble it. Remember, building your gaming PC is a fun and rewarding experience that allows you to tailor your system to your gaming needs and preferences.
As a beginner, it’s natural to feel a bit overwhelmed, but don’t worry. Take your time, refer to manuals and guides, and don’t hesitate to seek help from friends who have experience with PC building. The journey of creating your gaming PC is an adventure in itself, and with each step, you’ll gain more confidence in your abilities.
Once your gaming PC is up and running, the real excitement begins. Explore a vast library of games, tweak settings for optimal performance, and immerse yourself in breathtaking visuals and smooth gameplay. Whether you’re a casual gamer or a dedicated enthusiast, your new gaming PC will open up a world of possibilities.
Hope this article provided enough information about your journey of building your dream PC. Unleash your passion, conquer virtual worlds, and let your gaming PC be the portal to unforgettable adventures.
Kindly share your views and thoughts in the comment Section.
Happy gaming!
You might find the following articles quite useful